Every enterprise landing zone I build on Azure starts with the same exercise: sketch a Cloud Adoption Framework (CAF) aligned hub-and-spoke address plan before anyone reaches for Terraform. It’s foundational work that demands care, because the allocation has to scale across regions, environments, and the inevitable managed services that arrive later.
Spreadsheets help, but they slow down when the questions get more ambitious. To keep the numbers sensible—and to follow CAF guardrails faster—I turned the internal worksheet I depend on into an interactive tool. I built it for my own planning sessions, but I hope it saves you time too:
The planner is now live on the site. This overview explains the design goals, the core features, and how to put it to work on a CAF deployment.
Why another subnet calculator?
Most subnet calculators stop at “give me a /24”. A Microsoft CAF-aligned hub-and-spoke rollout needs more:
- Preserve the CAF hierarchy. Regions, hubs, spokes, VNets, and subnets have to line up with your landing zone model and subscription boundaries.
- Keep space for the future. When you carve a hub, you still need room for the managed services and security appliances you haven’t bought yet.
- Work across every RFC1918 range. Plenty of clients still own large 10/8 chunks on-prem, so we need flexible templates for 172.16/12 and 192.168/16 too.
- Share the plan. Teams want something they can tweak in front of stakeholders and then export for deployment.
So the planner bakes all of that in. It supports the classic simple hub-and-spoke, plus CAF multi-region templates that include environments (Dev/Test/Prod by default) and Azure extras like Firewall, Bastion, Gateway, and Private Endpoints.
Highlights at a glance
Here are the pieces I reach for when running engagements:
- Built-in CAF templates. Kick off with pre-sized blocks for typical hub-and-spoke layouts across 10.0.0.0/8, 172.16.0.0/12, or 192.168.0.0/16. Adjust the prefixes, anchors, or gaps if you need a bespoke carve-up.
- Auto-guardrails for Azure reserved IPs. VNets and subnets account for the five IPs Azure keeps back, so the “usable” numbers stay honest.
- Subnet templates for managed services. One-click Azure Firewall, Bastion, Gateway, and Private Endpoint subnets with the enforced minimum sizes.
- CSV export. Hand the address allocations to whoever is deploying ARM/Bicep/Terraform, or paste them straight into your documentation.
- Saved designs and drafts. Your current work auto-saves in the browser, and you can keep a library of named designs for different clients or environments.
A quick tour of the planner
The walkthrough below shows a typical first run.
1. Pick the master template
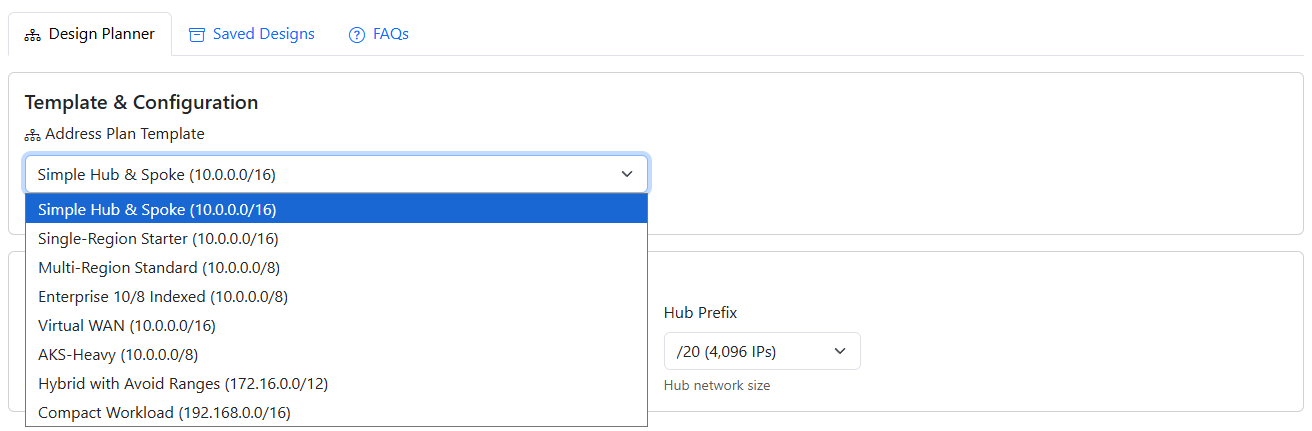
Open the planner and choose a template from the Template & Configuration card. Each template sets:
- Master CIDR and region block prefix
- Hub and spoke sizes
- Optional gaps for future spokes
- Whether we anchor the hub at the start or end of the range
You can still override any of these once loaded.
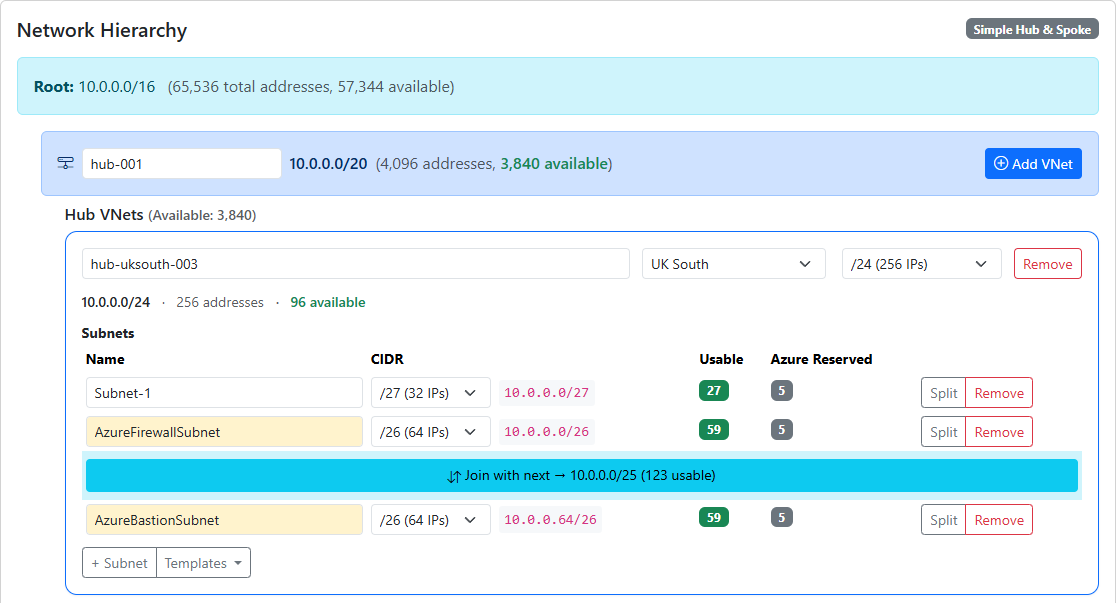
2. Shape the hub
The Hub card shows the current CIDR, capacity, and available IPs. Need more room for Azure Firewall, Bastion, or an Internal Load Balancer? Either:
- Adjust the Hub Prefix dropdown (the tool checks existing allocations before shrinking), or
- Click Add VNet to create the individual VNets the hub will host, then add subnets using the template buttons.
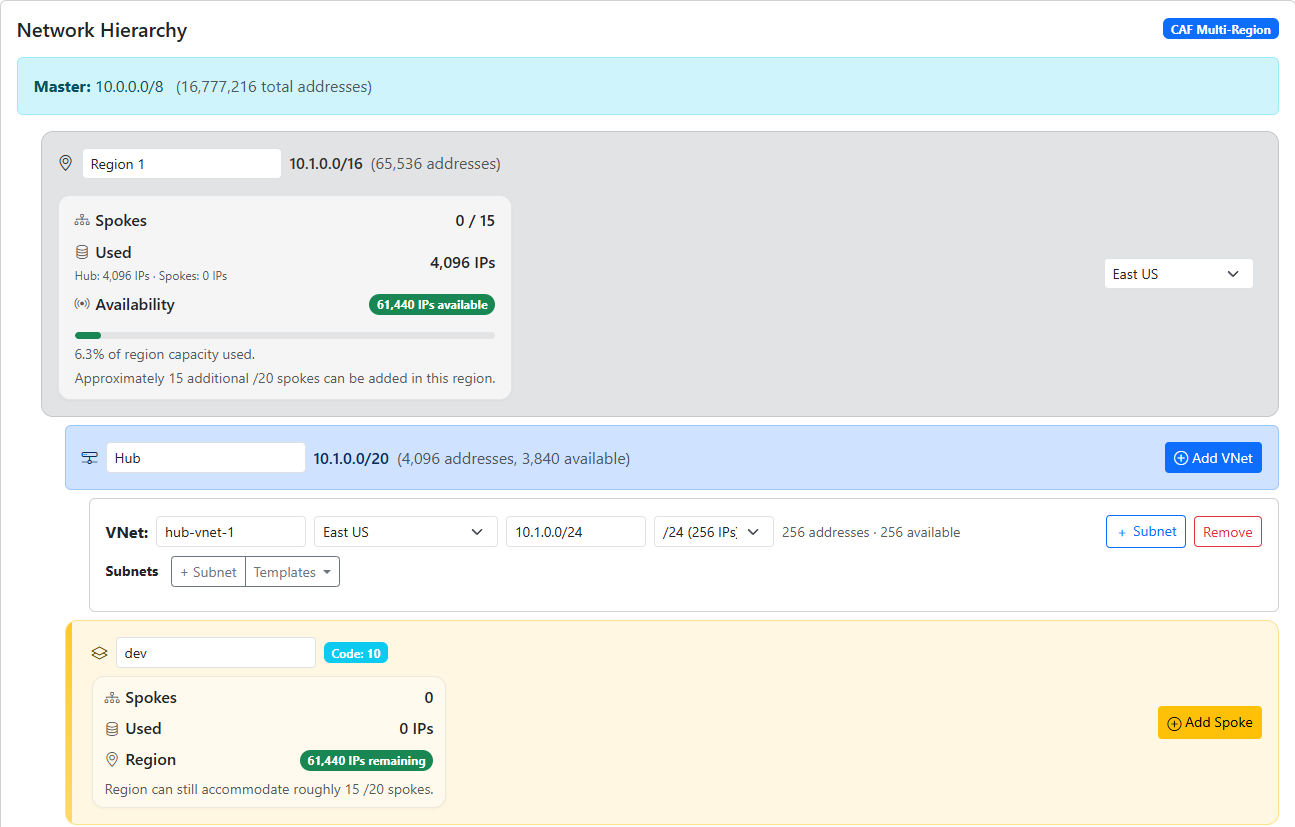
3. Add spokes and environments
CAF mode introduces regions and environments so you can mirror your landing zone structure. Each environment (Dev/Test/Prod by default) shows its spokes, usage, and room left in the regional pool. Use Add Spoke to generate a new spoke VNet block sized to your prefix; then add workload VNets and subnets inside it.
4. Review the address allocation table
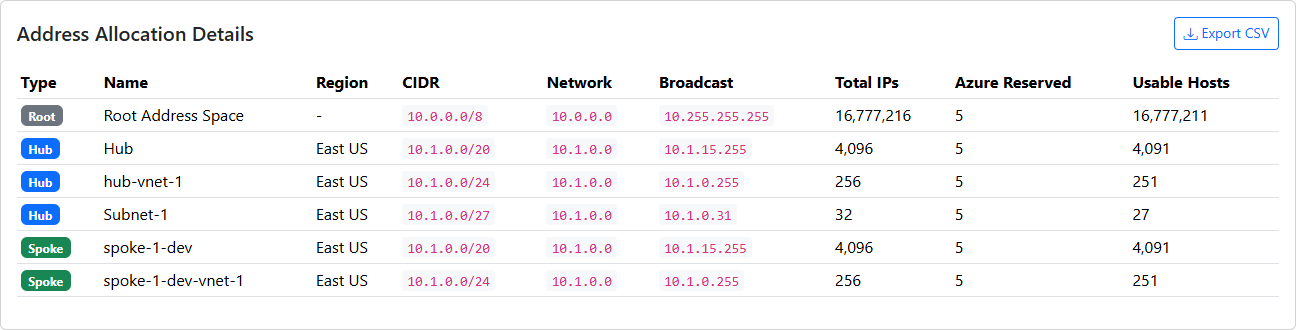
Scroll down to the Address Allocation Details table to see every network, region, CIDR, and host count. The numbers auto-update as you add or resize VNets. When you’re ready to freeze a version, hit Export CSV and drop it into your change record or Terraform variables.
5. Save the design for later

At the bottom of the planner you’ll find the Save & Restore section. Give the current design a meaningful name (e.g. “Corp-Prod-EMEA 10.0/8”) and click Save Design. It lands in the Saved Designs tab where you can reload or delete it later. Drafts are saved automatically, so if you close the tab mid-workshop you won’t lose anything.
When to use it
Typical use cases include:
- Producing a baseline CAF-aligned address plan before it gets translated into Bicep, Terraform, or the landing zone accelerator.
- Stress-testing a design to ensure there is sufficient space for future spokes and region growth.
- Demonstrating Azure’s service guardrails (for example, why Firewall requires /26) during technical reviews.
- Capturing the state of a design for governance teams by exporting a complete inventory of networks.
Because the planner runs entirely in the browser, it is portable across client machines and doesn’t require credentials or telemetry.
What’s next
This first release gets the essentials down: hub and spoke planning, CAF scaffolding, Azure service guardrails, exports, and saved states. I’m already sketching:
- The ability to export Terraform/Bicep stubs alongside the CSV
- Shareable “design links” that include the planner state
- Additional templates for industry-specific landing zones
If you have a suggestion or spot an edge case, drop me a note — the planner is built to evolve with real-world feedback.
Ready to try it? Fire up the Azure Hub & Spoke Subnet Planner and let me know what you build with it.